

The Pokémon Company is continuing to reveal new Pokémon TCG products and content. Read on below to learn more:
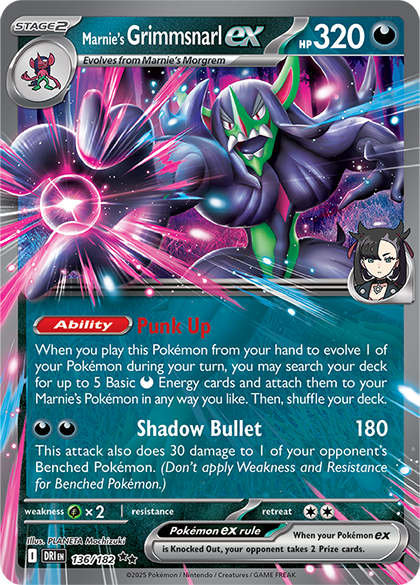
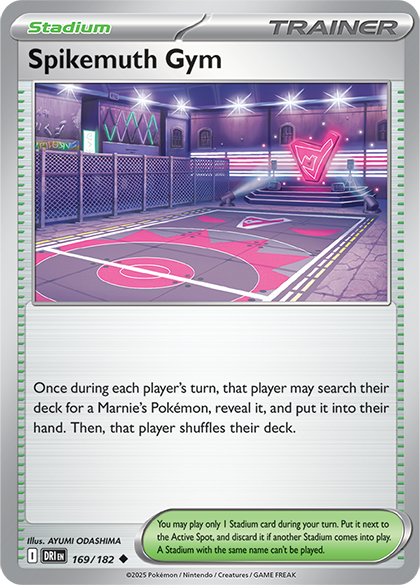
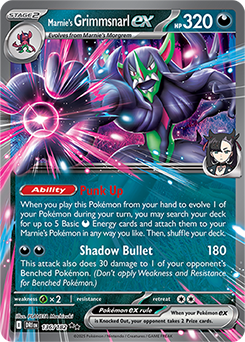
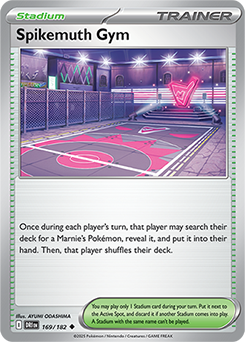
Bring punk vibes to your Froslass and Munkidori deck with Marnie’s Grimmsnarl ex and Spikemuth Gym.
By Natalie Millar, Contributing Writer
Hello everyone! The Pokémon Trading Card Game: Scarlet & Violet—Destined Rivals expansion has provided a massive shake up to the metagame, with Trainer’s Pokémon leading the way. One of the top decks from the expansion is Marnie’s Grimmsnarl ex, which was piloted to huge success in the Aichi Champion’s League by the top Japanese testing group, with multiple copies ending up in the top 16.
The way Marnie’s Grimmsnarl ex was used was very interesting in that it was slotted into the already existing Froslass/Munkidori deck. Froslass/Munkidori has been around the metagame since the release of Scarlet & Violet—Twilight Masquerade, but it has failed to see much success at a high level primarily due to its being weak against aggressive decks, particularly ones that use Iron Hands ex.
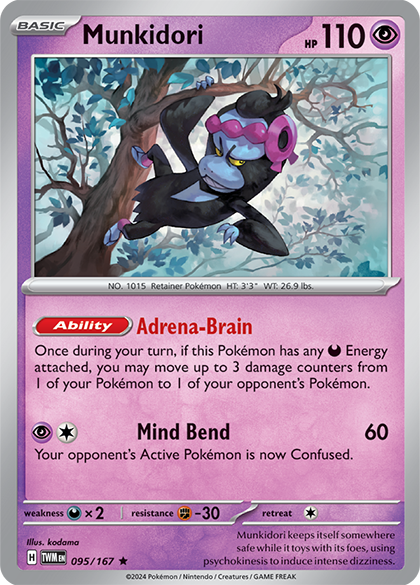
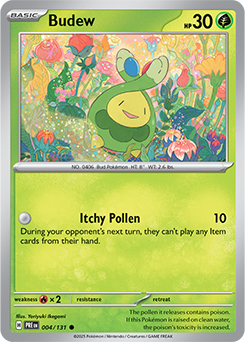
Froslass/Munkidori primarily functioned as a slow spread deck: it used Froslass’s Freezing Shroud Ability to put damage counters on both players’ boards and then Munkidori’s Adrena-Brain Ability multiple times to move damage over to and eventually wipe your opponent’s board. The deck gained a small boost with the release of Budew in Scarlet & Violet—Prismatic Evolutions by using Itchy Pollen to slow down the opponent, but it was the addition of Marnie’s Grimmsnarl ex that really pushed it over the top.
At first glance, Marnie’s Grimmsnarl ex doesn’t have much synergy with the rest of the deck. After a few games, however, it feels as though it fits in with Froslass and Munkidori perfectly. Thanks to Marnie’s Grimmsnarl ex’s Punk Up Ability, your attachments are freed up to put Darkness Energy on Munkidori cards. While you can do the same with Charizard ex’s Infernal Reign, the fact that Marnie’s Grimmsnarl ex uses the same Energy type as Munkidori makes the deck much more streamlined. Spikemuth Gym is also massive for the deck, allowing you to set up the Stage 2 Marnie’s Grimmsnarl ex with relatively low maintenance.
With Spikemuth Gym increasing your consistency so much, the deck doesn’t need a dedicated draw engine such as Drakloak, Cleffa, or Noctowl, and it can just function on its own. Many builds don’t even include Fezandipiti ex—you often don’t benefit from the three extra cards, and the Fezandipiti ex itself acts as a liability. After playing several games in the lead up to the North America International Championships, this was the deck list I landed on!
Marnie’s Grimmsnarl ex
Pokémon (17)
- 3Marnie’s Grimmsnarl ex 136/182
- 2Marnie’s Morgrem 135/182
- 3Marnie’s Impidimp 134/182
- 3Munkidori 44/131
- 2Froslass 53/167
- 2Snorunt 51/167
- 1Budew 4/131
- 1Shaymin 10/182
Energy Cards (8)
- 8Basic Darkness Energy
Trainer Cards (35)
- 4Arven
- 4Iono
- 3Professor’s Research (Professor Sada)
- 2Boss’s Orders (Ghetsis)
- 2Artazon
- 2Spikemuth Gym
- 2Buddy-Buddy Poffin
- 2Counter Catcher
- 2Night Stretcher
- 2Rare Candy
- 2Technical Machine: Evolution
- 2Ultra Ball
- 1Defiance Band
- 1Earthen Vessel
- 1Rescue Board
- 1Secret Box
- 1Super Rod
- 1Technical Machine: Devolution
While this deck initially looks like a lot to set up (it has Stage 2, a Stage 1 Pokémon, plus multiple Munkidori that need Darkness Energy), thanks to Artazon, Spikemuth Gym, and Technical Machine: Evolution, it becomes relatively easy to get off the ground. You will rely heavily on Secret Box to get you out of the early game: it turns your Arven into an early Technical Machine: Evolution. You’ll also need a Spikemuth Gym to find Marnie’s Grimmsnarl ex and another draw Supporter for your next turn. This deck is also able to make comebacks very well. Many decks without Grass-type attackers struggle to one-hit KO Marnie’s Grimmsnarl ex; having multiple Munkidori cards enables you to punish opponents who attempt to two-hit KO it by healing off much of the damage with Adrena-Brain.
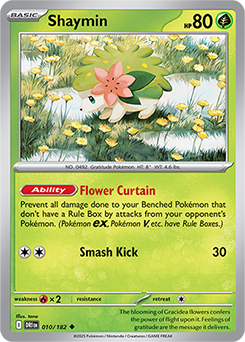
One strategy many decks can use against you is to go after the Froslass—you have no other way to damage your own Pokémon. Luckily, once enough damage is accumulated on your own Pokémon, it’s often useless for them to Knock Out Froslass. I chose to include Shaymin to protect Froslass initially: if you only get one use of Freezing Shroud, you sometimes struggle against decks that can one-hit KO Marnie’s Grimmsnarl ex. This deck also uses Budew to weave in Itchy Pollen in the middle of the game if you can’t use Shadow Bullet, and sometimes you can stifle your opponent’s setup by using Itchy Pollen in the early game. I only included the one copy since you rely so heavily on Technical Machine: Evolution for your early setup, but I think you could go to two copies of Budew if it becomes more important in the metagame.
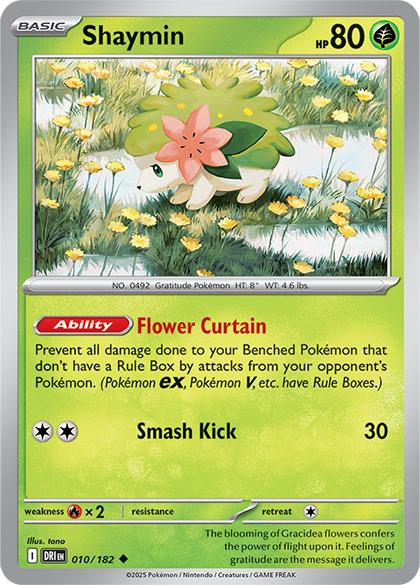
One area where this deck can struggle is against aggressive decks, especially since Joltik Box and Raging Bolt ex both have Grass-type attackers such as Galvantula, Iron Leaves ex, and Teal Mask Ogerpon ex that can deliver one-hit Knock Outs on Marnie’s Grimmsnarl ex. I had Fezandipiti ex in my deck list for a bit to help chain multiple Marnie’s Grimmsnarl ex against these decks, but I ultimately decided to instead lean on Defiance Band to enable Marnie’s Grimmsnarl ex to trade with your opponent’s threats. While it is scary if your opponent is easily dropping one-hit Knock Outs on your Marnie’s Grimmsnarl ex, remember that against Iron Leaves ex specifically you can attack with Budew, which can prevent them from playing Switch or Prime Catcher to reset Iron Leaves ex’s Prism Edge attack. You still try to set up Froslass against aggressive decks so that you can pile on the damage on both sides of the board, but make sure to Bench Shaymin against Raging Bolt to protect your Bench from its Thunderburst Storm attack.

You still function mainly the same against slower decks, but I would be much more careful with your board. You usually want exactly one Froslass in play. While you can afford to Bench two Snorunt against aggressive decks to prevent them from Knocking Out your only Froslass, against slower decks such as Dragapult ex, Gardevoir ex and the Marnie’s Grimmsnarl ex mirror match, they will often heavily punish you for Benching the second Snorunt by not delivering a Knock Out, leaving you with a dead board space. While evolving into both Froslass can work in certain matchups, against these decks they will often target your Munkidori and let your own Freezing Shroud Ability slowly KO your own Pokémon.
This is especially bad against Dragapult ex, as they can use the residual damage from Phantom Dive onto a Munkidori and set it up to get Knocked Out in between turns, usually through their own Munkidori. Against Gardevoir ex, it’s also very important to Bench Shaymin, as their main game plan against you is to use Scream Tail’s Roaring Scream to KO your Shaymin as soon as possible.

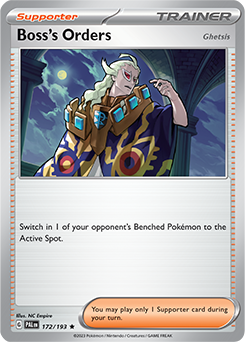
This particular deck list also has a small tech inclusion for the slower matchups: a second copy of Boss’s Orders. While many initial lists coming out of Japan played one copy of Boss’s Orders and three copies of Counter Catcher, I chose to switch these up and play two copies of each card. Counter Catcher is mainly strong against the aggressive decks because they’re typically ahead in Prize cards until the end of the game. Thanks to Munkidori’s Adrena-Brain Ability, you can always leave Pokémon on your opponent’s board as heavily damaged, then take the Prize cards later to give yourself access to Counter Catcher the whole game.
However, against decks like Gardevoir ex, Dragapult ex and the mirror match you can frequently end up in stalemates where neither of you want to take Prize cards to avoid activating your opponent’s Counter Catcher. Having access to multiple copies of Boss’s Orders is very important in these board states as you can use the first copy to take a slight advantage in the early game while still having the second copy available to close the game out. If you don’t have two copies of Boss’s Orders in your deck, you are often limited in the plays that you can make. These slower decks can take advantage of knowing that you don’t have access to their Benched Pokémon if you’re forced to use your one Boss’s Orders early on. Because it comes up so frequently in the mirror match, the Gardevoir ex matchup, and the Dragapult ex matchup, I would likely never play fewer than two Boss’s Orders in this deck.

Speaking of the mirror match, the early game often starts in a stalemate if neither player sets up Froslass. Basically, attacking your opponent’s Pokémon often results in a disadvantage for you because you give your opponent damage on their board and access to Counter Catcher by attacking early. Because of this, many players will try to set up Froslass to accelerate if they’re in this stalemate position, but with Froslass out, the game turns into a war of attrition with Munkidori cards. Having access to Boss’s Orders in this scenario is important since you can use it to specifically target your opponent’s Munkidori, allowing you to eventually get ahead in uses of Adrena-Brain. I would also avoid using Budew in the mirror match if you can: with its 30 HP, it is very susceptible to being picked off by Adrena-Brain.

Technical Machine: Devolution is a card that seems to fit perfectly in this deck. However, I’ve been on the fence about it. On the surface it seems very strong against the Stage 2 decks, however it hasn’t come up very often for me. Gardevoir ex has access to multiple Munkidori, and while you can set up to devolve their Gardevoir ex, thanks to its Weakness to Darkness, you can also one-hit KO Gardevoir ex with Shadow Bullet, effectively making Technical Machine: Devolution redundant. In the mirror match, your opponent can play around it very easily thanks to their multiple Munkidori cards. Plus, it is very difficult to set up to devolve a Marnie’s Grimmsnarl ex without attacking into it thanks to Marnie’s Morgrem having 100 HP. It’s often just more efficient to KO the Marnie’s Grimmsnarl ex itself rather than devolve them.
However, Technical Machine: Devolution does have some value against Dragapult ex: the Drakloak only have 90 HP and get pinged by Freezing Shroud in between turns. I do think you could justify playing Bravery Charm in this spot if you’re specifically worried about Dragapult ex. I still have Technical Machine: Devolution in this deck because of the Gholdengo ex/Dragapult ex matchup, which is surprisingly difficult without being able to devolve the Gholdengo ex back into Gimmighoul for easier Knock Outs. I would try not to overvalue the ability to devolve your opponent’s Pokémon in other matchups, though, as it’s often not as strong as just taking the Knock Outs with Shadow Bullet.
The count of Munkidori in this deck is also not a complete consensus among players—many are debating between playing three and four copies. In many matchups you can get away with only having two Munkidori, but against decks that attempt to repeatedly KO your Munkidori, you’ll often need to find them through Artazon. Prizing a Munkidori is also a cause of concern in the Gardevoir ex and mirror matchups because you do sometimes establish three Munkidori against them, which is where you can justify playing the four Munkidori.
However, I’m still only playing the three copies of Munkidori because you can often manage as long as you don’t Prize one. Starting a Munkidori is also very strong because if you end up using Technical Machine: Evolution then the Darkness Energy ends up on the Munkidori and is ready to use Adrena-Brain. I also was playing seven Darkness Energy for a short period of time; however, this deck ends up being very Energy hungry and Prizing or having to discard Energy becomes painful. Rescue Board also helps with your Energy management, as a common strategy against this deck is to bring up Pokémon you have that have a Retreat cost, such as Froslass or Shaymin. In these scenarios, being able to Arven for Rescue Board and still attach to Munkidori usually ends up being a difference maker!
Marnie’s Grimmsnarl ex is poised to be one of the strongest decks of the new Scarlet & Violet—Destined Rivals format and has already been adopted by many of the game’s best players! While this deck doesn’t have a draw engine of its own, you often get by through Spikemuth Gym and a ton of solid draw supporters. Good luck if you give this deck a shot. It’s a very complicated but rewarding experience!
Natalie Millar

Natalie has been playing Pokémon casually since late 2013 but started attending more competitive tournaments in late 2017. She won the first Regional Championships after the pandemic in her home city of Brisbane, Australia, and has been attending most major tournaments since. Outside of Pokémon, she studied psychology, but it doesn’t help with reading opponents as much as you would think. You can find her at most major tournaments and can follow her on X at @nataliem9999.
Source: Pokemon.com


Source: Pokemon


